Low-Carb Gingerbread House - Step By Step Guide
 Naomi Sherman
- Ready in 4h
- 2.4 g net carbs
- 95 kcal
- Serves 60
This post may contain affiliate links, see our disclaimer.

Confession: I’ve never made a gingerbread house before so when Martina asked me if I would give it a try, I was equal parts terrified and excited.
I used the recipes from the original Decorated Gingerbread Cookies and made a double batch of the dough and the icing, plus added some shredded coconut on top.
I’m throwing you to the wolves here. I have no idea how many serves are in a gingerbread house, lol. (Note: Serving size is estimated and can vary.)
Tips and Tricks For Making Keto Gingerbread House
Here are a few things that I learned:
Handle this gingerbread house with caution, this is NOT a rock steady gingerbread house.
How to get clean cuts — It's best to use ready-made gingerbread cookie cutter like this one. You could do it by knife but it could get tricky. Also, when you cut the doors and windows out of your dough, leave the section in while you bake the gingerbread. This will help the lines to stay clean. You will then re-cut the shapes once baked.
Sugar-free royal icing is different — It sets firm but not hard like traditional icing so it doesn’t give the same structural support. I would 100% recommend using toothpicks to provide additional support.
How to secure the roof — I cut a piece of baking paper slightly smaller than the finished roof size, covered it in icing and pressed the roof pieces firmly onto it. Í did this step first to allow the icing to set as much as possible. This makes it so much easier to sit the roof in place.
Make the royal icing in two parts — The icing will start setting so it's best to make it in two parts, one for assembling the house and one for decorating the outside of the house. You cay have some leftover icing which you can use for decorating any keto cookies.
How to make the royal icing look best — I found the best way to make the icing look snowy around the edges was to pipe the icing and then use a teaspoon or brush to drag the icing down to look like snow drifts. I also scattered coconut over the wet icing to give it a snow-like appearance.
Soft vs crunchy gingerbread house — The gingerbread cookie will start to soften after 1 to 2 days but you can make it last crispier for longer if you dehydrate the cut-outs just before assembling. Make sure the cookies are cut out (follow the recipe until Step 7) and then bake the cut-outs at 100 °C/ 210 °F (fan assisted), or 120 °C/ 250 °F (conventional) for 20 to 30 minutes. Let them cool down completely before assembling.
Recipe Substitutions
- Sukrin Gold can be switched out for a different low-carb sweetener such as Erythritol, Swerve or Allulose, but really it does help with that beautiful golden colour and rich flavour.
- Yacon syrup (5.6 g net carbs per 2 tsp) can be substituted with blackstrap molasses (8.5 g net carbs per 2 tsp), or omitted, but it really does help with that golden colour and rich flavour.
- If you want to make these cookies 100% dairy-free, replace butter with an equivalent amount of sustainably sourced palm shortening.
- You could use an additional 2 teaspoons of xanthan gum which will make the rolling easier.

Step-by-step
Prepare the gingerbread dough from the original Decorated Gingerbread Cookies but instead make two batches as per this Keto Gingerbread House recipe.
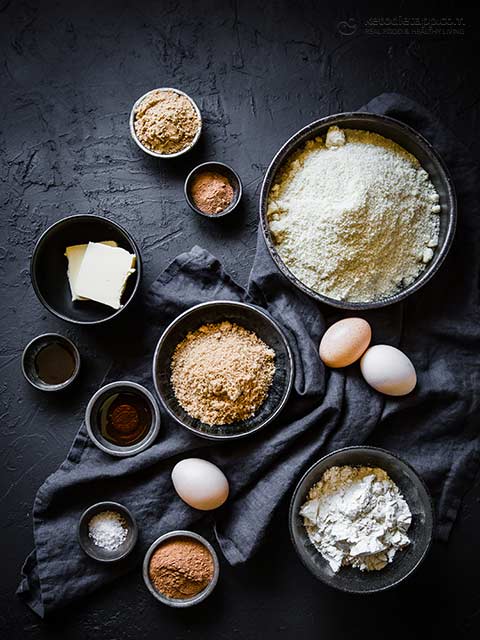
Mix all of the dry ingredients into a large mixing bowl (You could add 2 tsp xanthan gum for easier rolling although we made this house without it.) Melt the butter and add it, along with the eggs and vanilla, to the mixing bowl.

Beat on low until a soft dough forms. Tip out onto a sheet of cling-wrap and shape into a thick disc. Refrigerate for two hours or overnight.

Now the fun part begins — let's make the Gingerbread house! Preheat the oven to 170 °C/ 340 °F (fan assisted), or 190 °C/ 375 °F (conventional).
Working on one piece of dough at a time and storing the remainder in the fridge, roll out between two sheets of silicone mat or parchment paper until about 1/2 cm (1/4 inch) thick. Note: If the dough starts to feel a bit soft and difficult to handle, just pop it back in the fridge for five minutes or so.
For this part it's best to use ready-made gingerbread cookie cutter. You could do it by knife but it could get tricky. When you cut the doors and windows out of your dough, leave the section in while you bake the gingerbread. This will help the lines to stay clean.
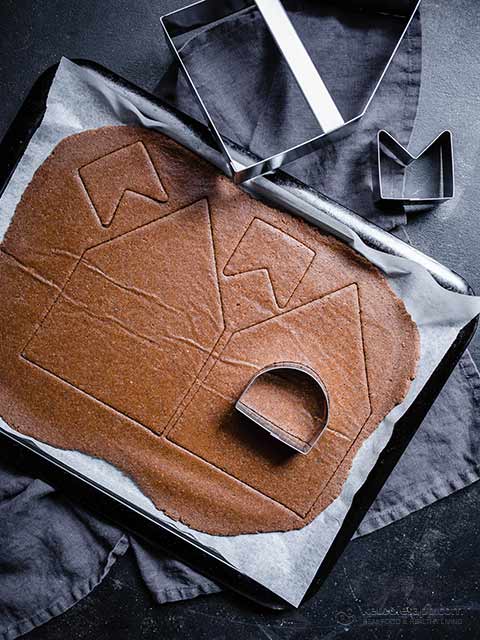
Bake for 8 to 12 minutes (the exact time will depend on the thickness on the cookie). Once the gingerbread comes out of the oven (it should be light golden, not too dark), use your cutters to re-cut the shapes while the gingerbread is still soft. Be careful, this is NOT a rock steady gingerbread house. (For a crunchier gingerbread house, check the tips in the post for crisping up the cookies at a lower temperature setting.)

Make the icing from half of the ingredients: 1 egg white, 1 1/2 cups powdered sweetener and 1/4 tsp lemon juice. Sift the powdered sweetener into a mixing bowl and add the egg white and lemon juice. Mix on low until combined the beat until smooth.
To test your consistency, do an eight-second test; trace a pattern in the top of the icing with a knife and then count down the seconds until it disappears back into the surface. Eight seconds will give you perfect piping consistency. If you need it thinner, add a very small amount of water at a time.

To make the roof, cut a piece of baking paper slightly smaller than the finished roof size, covered it in icing and pressed the roof pieces firmly onto it.

This makes it so much easier to sit the roof in place.

Spread some of the icing on where you plan to assemble the gingerbread house (It can be an upside down baking tray or a cake stand). Be generous with your icing at the base of the walls to help to hold them in place. Start by laying a base of icing down and piping a line along the end of your wall.

Put the end wall and one side together and pipe a thick line of icing along the inner join, then gently insert a toothpick to create a corner support. Repeat with the other two walls and leave it to set for about half an hour.

I put fairy lights inside mine at this stage but that is completely optional.

Make the chimney by sticking the pieces together as shown and leaving it upside down to set.

Pipe a thick line around the top of the walls and gently fold the roof into shape, leaving the paper attached to the underside, and lower it into position. Don’t press hard as the house may collapse!

Pipe a line of icing around the base of the chimney and place on top of the roof. Leave to set for a further half an hour.

Make your second batch of icing to decorate the outside of the house.

Be careful not to go overboard with your icing or it will run down the side of the house like mine did... (Oooops) Any leftover icing can be used for decorating other keto cookies.
Finally, scatter shredded coconut over the wet icing to give it a snow-like appearance.

This house won’t keep for more than a few days as the cookie will start to soften (check tips in the post above for crunchier texture) and it’s almost impossible to cover it to store, unless you have a cool room to store it.

Recipe
Low-Carb Gingerbread House - Step By Step Guide
★★★★★4.8How to make a show stopping gingerbread house from scratch. A step-by-step guide to making low-carb ...
- Hands on
- 1h
- Overall
- 4h
- Servings
- 60
- 2.4 g
- Net carbs
- 4.7 g
- Protein
- 7.3 g
- Fat
- 95
- kcal
Ingredients makes 1 Gingerbread House, about 60 servings
- Gingerbread dough:
- Royal icing:
Instructions
Prepare the gingerbread dough from the original Decorated Gingerbread Cookies but instead make two batches as per this Keto Gingerbread House recipe.
Mix all of the dry ingredients into a large mixing bowl (You could add 2 tsp xanthan gum for easier rolling although we made this house without it.) Melt the butter and add it, along with the eggs and vanilla, to the mixing bowl.
Beat on low until a soft dough forms. Tip out onto a sheet of cling-wrap and shape into a thick disc. Refrigerate for two hours or overnight.
Now the fun part begins — let's make the Gingerbread house! Preheat the oven to 170 °C/ 340 °F (fan assisted), or 190 °C/ 375 °F (conventional).
Working on one piece of dough at a time and storing the remainder in the fridge, roll out between two sheets of silicone mat or parchment paper until about 1/2 cm (1/4 inch) thick. Note: If the dough starts to feel a bit soft and difficult to handle, just pop it back in the fridge for five minutes or so.
For this part it's best to use ready-made gingerbread cookie cutter. You could do it by knife but it could get tricky. When you cut the doors and windows out of your dough, leave the section in while you bake the gingerbread. This will help the lines to stay clean.
Bake for 8 to 12 minutes (the exact time will depend on the thickness on the cookie). Once the gingerbread comes out of the oven (it should be light golden, not too dark), use your cutters to re-cut the shapes while the gingerbread is still soft. Be careful, this is NOT a rock steady gingerbread house. (For a crunchier gingerbread house, check the tips in the post for crisping up the cookies at a lower temperature setting.)
Make the icing from half of the ingredients: 1 egg white, 1 1/2 cups powdered sweetener and 1/4 tsp lemon juice. Sift the powdered sweetener into a mixing bowl and add the egg white and lemon juice. Mix on low until combined the beat until smooth.
To test your consistency, do an eight-second test; trace a pattern in the top of the icing with a knife and then count down the seconds until it disappears back into the surface. Eight seconds will give you perfect piping consistency. If you need it thinner, add a very small amount of water at a time.
To make the roof, cut a piece of baking paper slightly smaller than the finished roof size, covered it in icing and pressed the roof pieces firmly onto it.
This makes it so much easier to sit the roof in place.
Spread some of the icing on where you plan to assemble the gingerbread house (It can be an upside down baking tray or a cake stand). Be generous with your icing at the base of the walls to help to hold them in place. Start by laying a base of icing down and piping a line along the end of your wall.
Put the end wall and one side together and pipe a thick line of icing along the inner join, then gently insert a toothpick to create a corner support. Repeat with the other two walls and leave it to set for about half an hour.
I put fairy lights inside mine at this stage but that is completely optional.
Make the chimney by sticking the pieces together as shown and leaving it upside down to set.
Pipe a thick line around the top of the walls and gently fold the roof into shape, leaving the paper attached to the underside, and lower it into position. Don’t press hard as the house may collapse!
Pipe a line of icing around the base of the chimney and place on top of the roof. Leave to set for a further half an hour.
Make your second batch of icing to decorate the outside of the house.
Be careful not to go overboard with your icing or it will run down the side of the house like mine did... (Oooops) Any leftover icing can be used for decorating other keto cookies.
Finally, scatter shredded coconut over the wet icing to give it a snow-like appearance.
This house won’t keep for more than a few days as the cookie will start to soften (check tips in the post above for crunchier texture) and it’s almost impossible to cover it to store, unless you have a cool room to store it.
Nutrition per serving, about 28 g/ 1 oz piece
Carbs 10%Protein 20%Fat 70% of calories
- Net carbs
- 2.4 g
- Total carbs
- 13.9 g
- Fiber
- 1.5 g
- Sugars
- 1 g
- Protein
- 4.7 g
- Fat
- 7.3 g
- Saturated fat
- 1.6 g
- Calories
- 95 kcal
- Sodium
- 60 mg · 2.6% RDA
- Magnesium
- 31 mg · 7.7% RDA
- Potassium
- 119 mg · 5.96% EMR
Nutrition by ingredient
| Per about 28 g/ 1 oz piece | Net carbs | Protein | Fat | kcal |
|---|---|---|---|---|
| Almond flour (blanched ground almonds, almond meal) | 0.9 g | 2.1 g | 5.3 g | 59 |
| Whey protein powder (protein isolate, Jay Robb) | 0.1 g | 1.6 g | 0 g | 7 |
| Sukrin Gold, brown sugar substitute | 0.2 g | 0 g | 0 g | 0 |
| Ginger (ground, dried), spices | 0.4 g | 0.1 g | 0 g | 2 |
| Cinnamon, spices | 0.1 g | 0 g | 0 g | 1 |
| Nutmeg, spices | 0 g | 0 g | 0 g | 0 |
| Salt, sea salt | 0 g | 0 g | 0 g | 0 |
| Egg, whole, fresh, raw (free-range or organic eggs) | 0 g | 0.6 g | 0.5 g | 7 |
| Butter, unsalted, grass-fed | 0 g | 0 g | 1.5 g | 14 |
| Vanilla extract, sugar-free, alcohol-based | 0 g | 0 g | 0 g | 0 |
| Yacon syrup, natural sweetener | 0.2 g | 0 g | 0 g | 1 |
| Egg white, fresh | 0 g | 0.1 g | 0 g | 1 |
| Swerve, natural sweetener (Erythritol and chicory inulin based) | 0.4 g | 0 g | 0 g | 2 |
| Lemon juice, fresh | 0 g | 0 g | 0 g | 0 |
| Coconut, dried, desiccated, shredded (organic, unsweetened) | 0 g | 0 g | 0 g | 1 |
| Total | 2.4 g | 4.7 g | 7.3 g | 95 |
Serving size about 28 g/ 1 oz piece
- Gluten free
- Dairy free
- Nightshade free
- Pork free
- Avocado free
- Coconut free
- Fish free
- Shellfish free
- Beef free
- Pescatarian
- Vegetarian
You may also like
Low-Carb Caramelized Pecans

Homemade Christmas Spice Extract
World's Best Keto Chocolate Cake

Keto Sweet Spiced Cheese Balls

Chewy Low-Carb Almond Cookies

Chocolate Keto Blender Cupcakes

Keto Peanut Butter Truffles

Low-Carb Pink Rose Cocktail
The Best Keto White Chocolate
Low-Carb Chocolate Chip Banana Bread
Easy 5-Ingredient Keto Nutella

Super Simple Almond Flour Keto Muffins

Homemade Low-Carb Baileys Irish Cream
Keto Mocha Cream Chocolate Cups
Boozy Keto Chocolate Mousse Bowls

Romantic Chocolate, Cardamom & Rose Petal Cookies
Comments & ratings (8)
Do you think adding in a bit of oat fiber would help this stay a bit more firm? I’ve heard that using too much oat fiber can make baked goods hard as a rock….of course, you wouldn’t be eating it after…..
Sorry, I know this is a bit late for Christmas... I'd love to help with that one but I haven't really used it in cookie recipes. I've tried it once and didn't react well to it so I ditched it. I think xanthan gum is the best option if you need to make it easy to roll & work with.
Where did you get the house cookie cutters? That would be so much easier than cutting it out with a knife.
Hi Cherise, I've seen different designs on Amazon but I'm sure there will be other online stores you get get it from. (This recipe was created by Naomi who lives in Australia.)
Hello Naomi, this is one of the most creative recipes that I have ever seen. I am not sure if I will be able to make it or not but I will definitely try it. Thanks for the recipe.
It is for sure one of those challenging recipes - but then for me making a regular gingerbread house is just as challenging. Good luck! 😊
I want to live in this! Seriously beautiful Naomi. xx
I totally agree, Naomi totally nailed this one, so pretty!